For a Quick Reference

Wednesday, October 31, 2012

Halloween birthday with lots of blood

Nathan's birthday is in October. When he was a kid, he thought Halloween was his own special holiday. 

This year we wanted to celebrate with a spooky date night, similar to our perfectly spooky date a few years ago. For that date we went to a historical cemetery to watch an outdoor performance of Hamlet under a full moon. That's hard to beat.

After dining at a great Italian restaurant with some dear friends, we all headed to a live play performed by The Baron's Men in Austin, a local theater group that performs Elizabethan plays true to their historical origins. 

The setting was naturally spooky. The theater is built on  private property, so the journey there was unusual. We followed a narrow road carved through craggy hillsides and winding through the sprawling estate. 

As we drove through the grounds, we passed signs stating, "Turn right for the carriage house" or "Turn left for the castle" and "Turn here for the village" or "Go straight for the theater".

 Seriously? What kind of place was this?

The theater was nestled under some majestic trees, near the lake shore bordering the estate. Torches lit the parking areas and costumed ushers collected our tickets. We could hear the bats flying overhead as the night darkened and shadows deepened around us. 

The theater was a replica of Shakespeare's original Globe Theater, with balconies surrounding an intimate stage. The setting was magical in its own way, making me wish I was dressed in historical clothing.

 Here is the view of the theater seating. 


The play itself was perfect for Halloween. It was a collection of over a dozen of spooky scenes collected from the writings of the Elizabethan era or earlier. 

Shakespeare's dark scenes were there: Hamlet's paternal ghost haunted the stage, MacBeth's cackling witches danced around their smoking cauldron, and Othello's murderous deeds filled the stage with screams. We were enthralled with Beowolf's classic battle with Grendel the dragon and witch curses cast in their original Norse language.

I love the contagious energy that  radiates from a live stage performance! It's so magical and captivating. We really enjoyed the acting (even though I admit it was too violent for me...I prefer non-murderous entertainment. One Greek play was performed where everyone on stage was stabbed to death in a frenzied bloodbath. Yuck!).


 The costumes were breathtaking and the special effects were disturbing, especially with the rampant murder scenes where everyone onstage dies of stab wounds. 

Nathan's friend is Austin's reigning expert on creating fake blood. He supplies all the haunted houses and stages in Austin with blood that he makes at home. It's crazy realistic...disturbingly so. 

Anyway, he had free tickets to the play and gave them to us. 
(Thanks again, Edwin!)

Ever wonder how to make fake blood? Are you itching to make your own? See Edwin's tutorial video for making professional stage blood here:


Tuesday, October 30, 2012

How to make magic wands


Sarah has been obsessed with the Harry Potter books this year, and she's begged me to throw a Harry Potter birthday party next month. These are one of the party favors we'll be giving each guest.

I had seen lots of different ideas online on how to make magic wands, but most of the ideas were either 

1- too stupid-looking (seriously. A plain dowel painted brown? Boooring!)
or
2- way too time-consuming (I refuse to hand-carve customized wands for a dozen kids!)

Thanks to Pinterest, I found a perfect solution:

Hot glue wands.

First purchase a box of chopsticks. 

Drizzle liberal amounts of hot glue onto the end of the chopstick. Rotate the chopstick so the glue doesn't fall off as it begins to cool. 

If  you're impatient like me, you can speed the cooling process by dipped the handle of the wand into a large bowl of cold water. When the glue is ALMOST cool, it can be sculpted in a variety of ways to add interesting details. Small beads can also be added to create a knobby look on the handles. 


Here are the wands before receiving a coat of acrylic craft paint. Not very convincing, but just wait and see what happens later. 


Here is a finished product. Ta-Da!


I experimented with different techniques to get slightly different looks.

 This wand was shaped by pressing on the cool glue with a chopstick to create ridges. 


This wand was shaped by pinching the cool glue between my fingers to shape swirled ridges. It really helps to dip your fingers in cold water before handling the glue- otherwise it leaves a bumpy effect because the glue sticks slightly to your skin and leaves marks on the wand. Wet fingers leave a smooth finish.


This wand handle was shaped by pinching the cool glue and twirling the chop stick.


Here is a detail of the knobby end of the wand created by pressing various beads into the glue.


This wand handle was shaped by rolling the wand between my hands.


This wand has a wooden bead glued on the end to add a touch of interest.


Another technique I used was to lightly scrape the cool glue with the tines of a fork. It gave the handle a very woody look.

After applying my first coat of brown craft paint, the wands all looked like chocolate-dipped candies. Yikes!  They were like cartoon wands, not nearly convincing enough for me.

I applied a glaze with watered-down black paint and removed most of the glaze, leaving behind paint in the crevices. I did this a couple times with each wand to build the layers of color, blotting it carefully to leave behind mottled bits of contrast. Some wands were treated with a white wash instead of a black one. 

I like the variety we ended up with.


Her birthday is in a couple of weeks. We are doing "A Day at Hogwarts School" for her party, with classes in Potions, Charms, Care of Magical Creatures, and Transfiguration.

We're stocked with wizard cloaks, wands, class supplies, a secret passageway, and lots of magical games.

Have any suggestions for a Harry Potter cake?


Friday, October 26, 2012

Barbershop picnic

Nathan has the voice of an angel. I love to hear him sing! 

For the past year he has performed with a local barbershop group. It's the special brotherhood of the coolest guys in town. (Two of them are bishops- the 'awesome' points just skyrocketed, don't you think?) 

Each Sunday night they gather for practice. It's delightful to hear their voices swell together and fill the house with beautiful strains of masculine music. 

It's such a wonderful group of good men. Good friends like this are one of life's treasures for sure! 


They sing a mix of gospel, popular, sacred and classic barbershop songs.

They have performed for various functions in the community, but somehow the wives and families of these men never get to see the performances. To fix this terrible oversight, the men arranged a show just for their families.

We gathered for a potluck picnic with our special friends on a beautifully wooded property. 

It was such a special night! Our Littles enjoyed climbing trees, exploring the tree house and wading in the babbling brook bordering the yard. The highlight of the backyard was this wicker swing from India. This was definitely a popular hideout for the evening. The kids would twist the chain to wind it up as far as they could then let the swing spin out of control while the children shrieked in delight.


Unfortunately the camera died before the performance, so the pictures I have are all from the beginning of the evening. You'll have to trust me that it was wonderful.

Families packed the deck, feasting on delicious foods while children romped and played in the woods nearby.

We talked and laughed for an hour before the show began.


The men began their performance as the sun dipped behind the tree line. The music was so beautiful and mesmerizing....unfortunately the cicadas loved it as well.

The noisily buzzing insects joined in the music with gusto, sometimes overriding the men's voices altogether. There must have been hundreds of them residing in these trees.

Perhaps it was their way of speaking approval.


My heart felt so full. I'm so thankful for days like this that add to life's joy. 

It's these simple events that make life beautiful. 


Wednesday, October 24, 2012

Puzzles and Prophets


I love the fall. We eat pumpkin curry soup with crusty homemade french bread and sip hot cocoa topped with whipped cream while watching the deer graze outside our window. It's heavenly.

The air is deliciously crisp outside (which means it actually dipped below 74 degrees!).

Recently we spent a chilly Sunday afternoon sitting on plush cushions crowded around a little table. We were working on a family puzzle and listening to the prophet's voice. 


I treasure quiet days like this- my family all surrounding me in peaceful harmony.

I love listening to inspiring testimonies and feeling my spirit swell with good feelings. 

The gospel of Jesus Christ is such a beautiful blessing. It brings me so much joy, I can't imagine living without  it. 

My heart aches for those who stumble through life on their own, unaware of the peace and love freely given through the teachings of our Savior. 


Last night I made a killer garlic soup. It's the first time I've ever heard of- let alone tasted- garlic soup.

It's made with 40 cloves of roasted garlic, an onion, chicken stock, cream, and a squeeze of lemon.

MMMMMM. I have a new favorite recipe.

We shared this yummy meal with Nana Precious, our adopted Texan grandma.

She joins our family each month for a dinner and Family Home Evening. 

The kids adore her, and I particularly love her colorful personality.

Her house is eclectically decorated with all sorts of treasures.

I'll have to do a post all about her sometime....

Until then, enjoy the rest of the photos from our family afternoon working together on this puzzle.


Friday, October 12, 2012

Halloween face painting ideas- flames and flowers

Here are a couple face painting pictures to get your creative juices flowing for Halloween. 

facepaint, flame mask

The flaming mask is pretty quick and easy to create. 

The mask pictured above only took 3-4 minutes to create during a recent gig. 

If you have the luxury of more time, add more detail and shading with yellow and black to make the flames look more realistic.

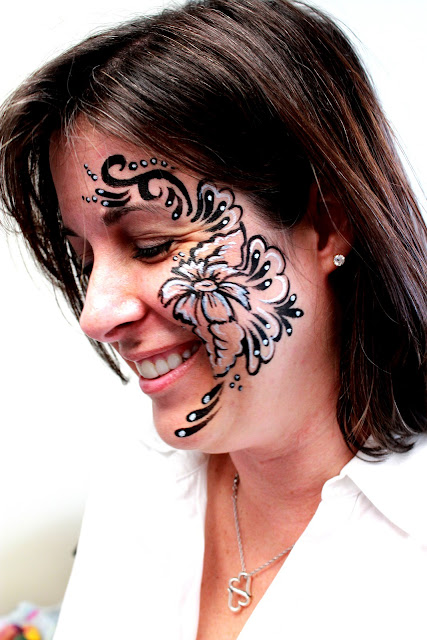
black and white line work face paint, flower pattern, elegant face paint

This is my very favorite pattern to paint. The black line work is so fun to paint. 

This pattern takes me about 3 minutes to create.

It's my most requested type of pattern at millionaire parties. 

For those parties I always add stick-on pearls or gemstones to add extra detail. 

(Unfortunately those clients don't let me take pictures, so I never have documentation 
of the more elaborate custom patterns I create for them! Drat.)

Below is basically the same floral pattern with color added. I think it's so gorgeous! 

I brushed on pearl powder to give it a nice shimmer.


I also really like tight flower patterns that stay confined to the cheekbone and eye. 

They look slightly more elegant and sophisticated compared to the 
sprawling half-face patterns I posted above. 

(See the pearls on the patterns below? I love them!)

face paint patterns for women, lady face paint, sophisticated face paint


Thursday, October 11, 2012

Cats and Baby Babble


Sarah adopted two kittens earlier this year. She calls them Severus Snape and Padfoot (can you tell Sarah loves Harry Potter?).

Severus (named for Sarah's favorite character in the book- are you shocked at her pick?) purrs nonstop and cuddles with anything he can find. The kids adore him. So do I. He's one of the best pets we've had so far.

They are the friendliest cats I've ever seen. They are the prefect foil for Saffron, our other feline who is convinced he's part cat, part demon. We love him, but he's not one bit cuddly. On the contrary, he'll purr disarmingly while he simultaneously scratches and bites. Such a shame. He's a great mouser though, so he's a keeper on our farm. He's not a pet... he's a work animal.

In other news, Diego has begun talking this month. Finally something has emerged from all the baby babbling we've heard for ages.

Want to know his first word?

I bet you can't guess.

Try it.

It's not Mama (we still don't hear that one) or Papa.

It's "Uh-oh!". (Is that foreshadowing for his future?)

He loves to announce "Uh-oh!" before dramatically dropping food from his high chair. If anything accidentally falls anywhere in our house, he'll announce in a soft voice, "Uh-oh." in a very solemn manner. His beensy lips make the cutest little 'o' when he says it. It's so endearing!

Last night we were at the church for youth activities. Diego disappeared for a moment. I found him in the gym, hugging a huge basketball and running full tilt to join the teenage boys on the court in the middle of a fierce game. He was laughing loudly and running as fast as his chubby little legs would carry him, eager to join the big boys in the fun. He's such a darling!

The other random news regards our garage remodel project. This week our contractor put up the new exterior wall- yay!

On Monday he poured the cement. A few minutes later the cement was dotted with tracks from chickens and kittens investigating the work.

We left the prints. I think it adds character, don't you?


Tuesday, October 9, 2012

How to make Jewelry and makeup organizers

My goal this year was to make my home a home of order. 

I seem to make this resolution EVERY year, which doesn't speak much of my yearly progress. I am only a failure if I give up, right?

My recent project focused on tackling the clutter and chaos in my bathroom.

Everything was kept in a little plastic drawer unit that sat on my counter. 

It looked awful and wasted my time.

I hated digging through my makeup containers trying to locate a specific product. 

My jewelry was tangled. 

I needed to get everything off my counter space into the vertical space.

This was my solution:


I love how everything is orderly and accessible in a hurry (which is really helpful Sunday mornings when I have only 10 minutes to get ready for church- gotta love those early-morning meetings or choir practices!).

It really streamlines my mornings, and I like the visual appeal of this system.

This is a tutorial for how I made my bathroom organizers.

I found two matching frames at the thrift store and re-purposed them. 

(Editor's note: I love snagging good frames at the thrift store! The uglier the print is, the cheaper the frame is. There are some fantastic frames holding ugly faded kitten prints. I paid $4 for each of these frames. If you pick up frames for a project, be sure to check the joining at the corners. That's the only part of a frame that can fail.) 

The frames were an ugly color, so I repainted them with a copper spray paint. There was no primer necessary since the paint I chose would adhere to any surface (Even plastics! You'll see why this is cool farther down.)

I wanted an aged look, so I applied a wash with Burnt Umber acrylic paint onto the frame, quickly buffing the paint off the raised scroll-work with a cotton rag to make it stand out. 

The directions are a bit different for the two organizers. To read about the jewelry organizer, scroll down a bit. 

Here is how I finished the make up organizer.

Nathan cut out a piece of sheet metal to fit inside the frame so I could organize everything with magnets. (Be sure you don't buy aluminium sheet metal- the magnets won't stick if you do.)

This was the most expensive part of the project. I was surprised how expensive sheet metal can be. I think I paid $20 for it, but we didn't use the entire sheet. Maybe if you buy sheet metal someplace other than Lowes you can get it cheaper.

(The leftover metal is going to be installed inside our kitchen cabinet doors. Why? To store all the to-do lists, school announcements, and artwork that normally clutter the fridge. )

I wrapped a pretty batik print fabric around the metal and glued it into place. 


I glued magnets onto the backs of my makeup compacts so they would stick to my organizer. This was super easy and pretty quick to accomplish. My Littles were so eager to help with this part.


I wanted my brushes to also be stored on the frame, so I made a pretty container for them. 

Can you guess what I used? 


It's a plastic frosting container that I spray painted copper. Ta-Da! 

I glued several magnets on the back like this:


And viola! One gorgeous organizer was done!


The jewelry holder was a bit different to create. 

It doesn't need the sheet metal background. Instead I spray painted some hardware cloth with copper paint to match the frame. I cut it to size and just placed it inside the frame on top of the fabric. 


I purchased some S-hooks from the hardware section of Lowes and painted those as well. I just popped them onto the hardware cloth and hung my necklaces. Ta-Da! 


The total price tag for these organizers was around $37. 

Reclaimed frames- $8
Sheet metal- $20
Copper spray paint- $5
S-hooks- $1
Magnets- $1
Fabric- Free, from my fabric stash
Hardware cloth- Free, from our barn

An organized bathroom- Priceless.


Linked to:


shabby creek cottage


I Heart Nap Time


HouseofHepworths


Lil\'Luna

Somewhat Simple